A Touch of Pwn - Part I
TL;DR
Microsoft’s Offensive Research and Security Engineering (MORSE) asked us to evaluate the security of the top three fingerprint sensors embedded in laptops and used for Windows Hello fingerprint authentication. Our research revealed multiple vulnerabilities that our team successfully exploited, allowing us to completely bypass Windows Hello authentication on all three laptops.
Introduction
We recently had the privilege of speaking at Microsoft’s BlueHat conference in Redmond, WA about a vulnerability research project on Windows biometric authentication our team performed for Microsoft’s Offensive Research and Security Engineering group (MORSE). The slides are available here. You can watch the recording of our BlueHat talk here.
Our objective was to evaluate the security of the top three embedded fingerprint sensors used for Windows Hello embedded by OEM laptop manufacturers.
Our target laptops were:
- Dell Inspiron 15
- Lenovo ThinkPad T14
- Microsoft Surface Pro Type Cover with Fingerprint ID (for Surface Pro 8 / X)
In this and follow-up posts we’ll summarize our vulnerability research process — which entailed extensive reverse engineering of software and hardware, breaking cryptographic implementation flaws in a custom TLS, and deciphering and reimplementing proprietary protocols — to go from very little knowledge about biometric authentication, to ultimately achieving full bypass of Windows Hello authentication on all three of our research targets.
We’ll also walk through some of the interesting parts of the Secure Device Connection Protocol (SDCP), reverse engineering highlights, custom Wireshark dissectors we created to understand proprietary host-to-sensor communication protocols over USB, and a novel approach to USB research and attack.
In follow-up posts, we’ll delve further into the technical details of the separate vulnerability chains we exploited on each target.
As part of our research, we also investigated various “presentation attack” methods. These are the more traditional attacks against biometric technologies, like lifting latent fingerprints from surfaces, creating fake fingerprints, etc. using tried and true methods as well as more novel approaches using 3D printing and other technologies. While we’re not going to focus on that for this post, we did develop several interesting techniques. Perhaps a post for another time.
Before we dig into our vulnerability research process and the actual vulns we found, let’s quickly discuss two key technologies in Windows Hello fingerprint authentication:
- Match on Chip (MoC) sensors
- Secure Device Connection Protocol (SDCP)
Match on Chip
All of the fingerprint sensors we targeted were “match on chip” or MoC (also known as “match in sensor”) type sensors. As opposed to match on host, MoC sensors have a microprocessor and storage built into the chip, which allows fingerprint matching to be performed securely within the chip. A database of “fingerprint templates” (the biometric data obtained by the fingerprint sensor) is stored on-chip, and enrollment and matching is performed directly within the chip. Since fingerprint templates never leave the chip, this eliminates privacy concerns of biometric material being stored, and potentially exfiltrated, from the host — even if the host is compromised. This approach also prevents attacks that involve simply sending images of valid fingerprints to the host for matching.
Because of these benefits, Windows Hello Advanced Sign-in Security (ESS) requires the use of match-on-chip sensors, and doesn’t currently support match-on-host (https://learn.microsoft.com/en-us/windows-hardware/design/device-experiences/windows-hello-enhanced-sign-in-security).
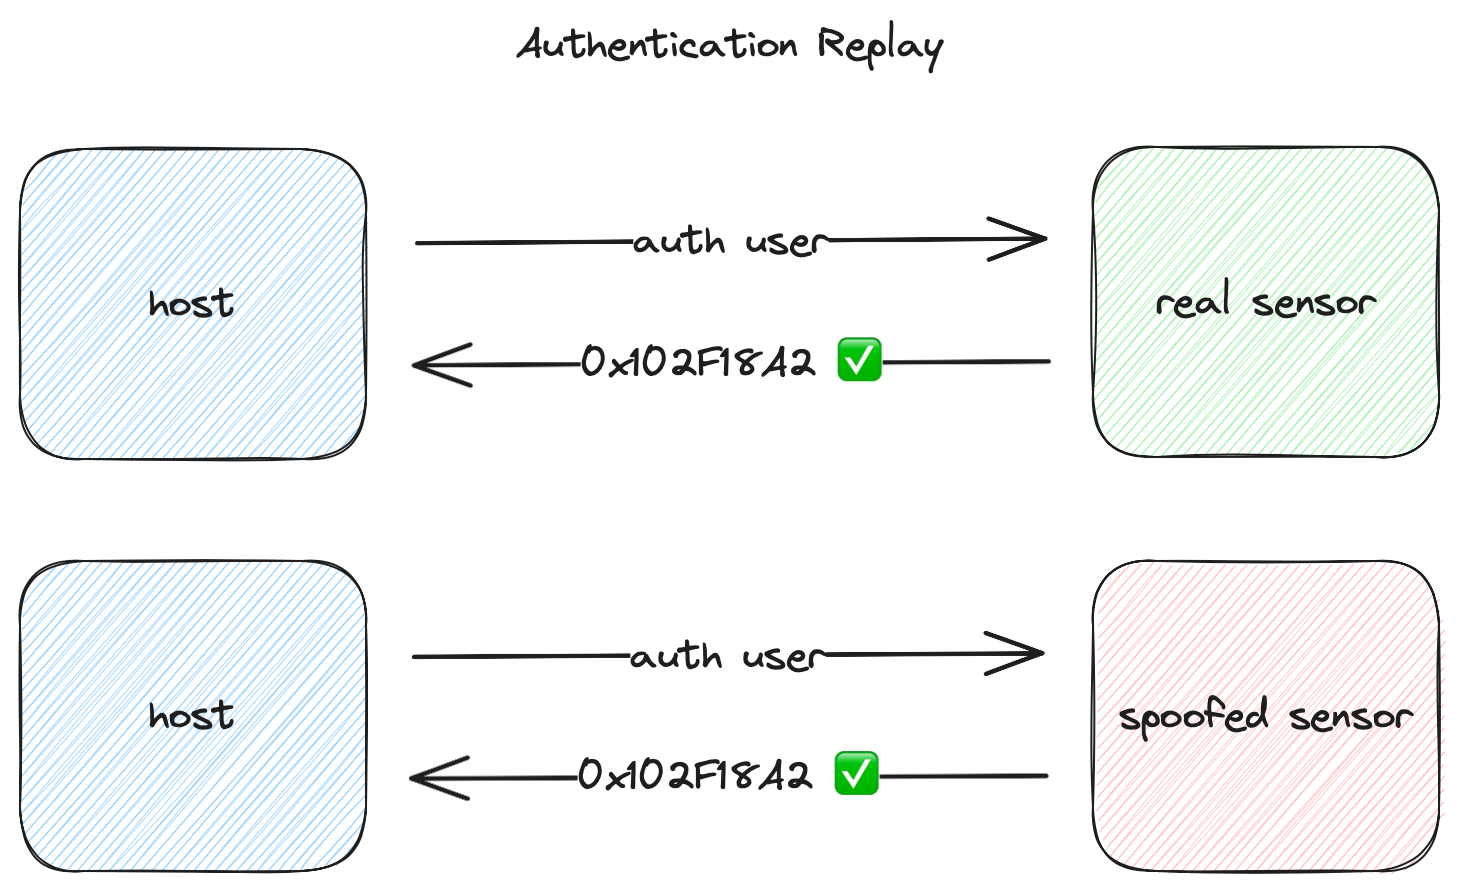
While MoC prevents replaying stored fingerprint data to the host for matching, it does not, in itself, prevent a malicious sensor from spoofing a legitimate sensor’s communication with the host and falsely claiming that an authorized user has successfully authenticated.
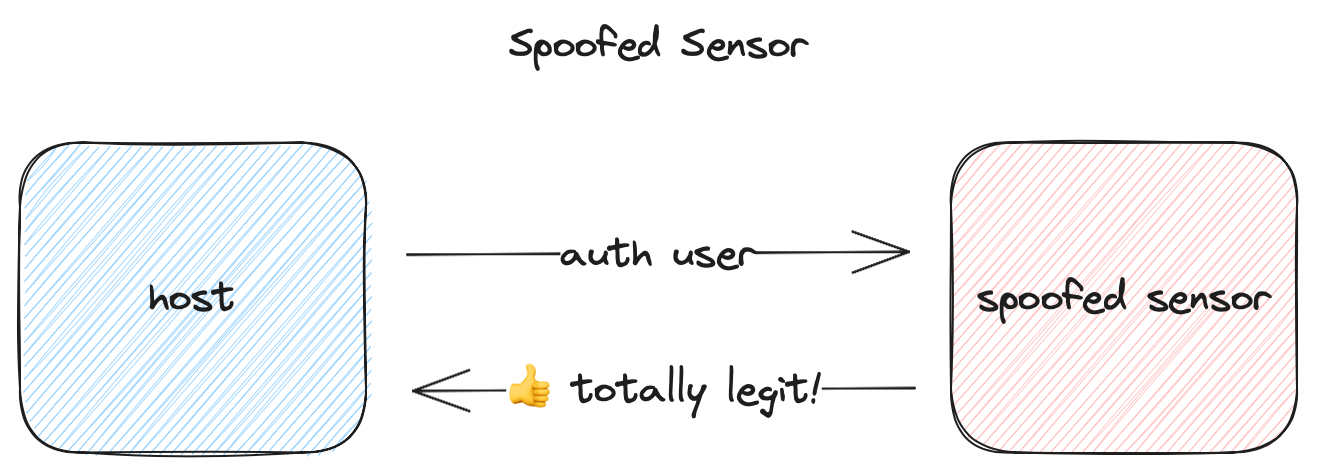
It also doesn’t prevent replay of previously observed traffic between the host and sensor.
To overcome these weaknesses, Microsoft created a protocol and set of standards to secure the connection between the host and fingerprint sensor, detailed below.
SDCP
The Secure Device Connection Protocol (SDCP) was created by Microsoft to enable secure biometrics with fingerprint sensors. It consists of a set of standards and a secure communications protocol with the following goals:
- Ensuring the fingerprint device is trusted
- Ensuring the fingerprint device is healthy
- Protecting input between the fingerprint device and the host
According to the SDCP specification, the goal of secure biometrics is to prevent a compromised OS from authorizing use of user keys when the user is not present. In other words, if secure biometrics is used for authentication, the host should be able to assume the user was present at the time of authentication. To facilitate this, SDCP aims to answer three questions about the sensor (paraphrased from the SDCP specification):
- How can the host be certain it’s talking to a trusted device and not a malicious device?
- How can the host be certain the device hasn’t been compromised (i.e. running hacked firmware)?
- How is the raw input from the device protected?
- The input has to be authenticated.
- The input cannot be replayable.
- The input needs to be “fresh” (i.e. nothing in the pipeline has held on to it and used it later).
To accomplish this, SDCP attempts to create an end-to-end secure channel between the host and the fingerprint sensor.
Secure Boot
Each device supporting SDCP and securebio has a small non-updatable bootloader in ROM (secure bootloader). This is the device’s root of trust.
As a part of the device certification process, Microsoft issues a model-specific certificate and private key. This private key is never meant to leave the factory floor, but is used to sign the public key in a device-specific key pair that is burned into the ROM (not accessible to flash firmware).
On boot, the secure bootloader:
- generates an ephemeral key pair
- hashes the updatable firmware it’s about to load
- signs the firmware’s hash and public key with the device-specific private key
- transfers execution to the flash firmware, passing the firmware hash, ephemeral key pair, and signature
This allows the firmware to create a cryptographically signed attestation, which chains back to the Microsoft issued certificate, that can then be verified by the host.
This doesn’t in itself prevent the loading of compromised firmware at runtime. Instead, it allows known compromised firmware to be blocked. In practice, we found that all devices we examined additionally encrypted and cryptographically signed their firmware to prevent direct tampering.
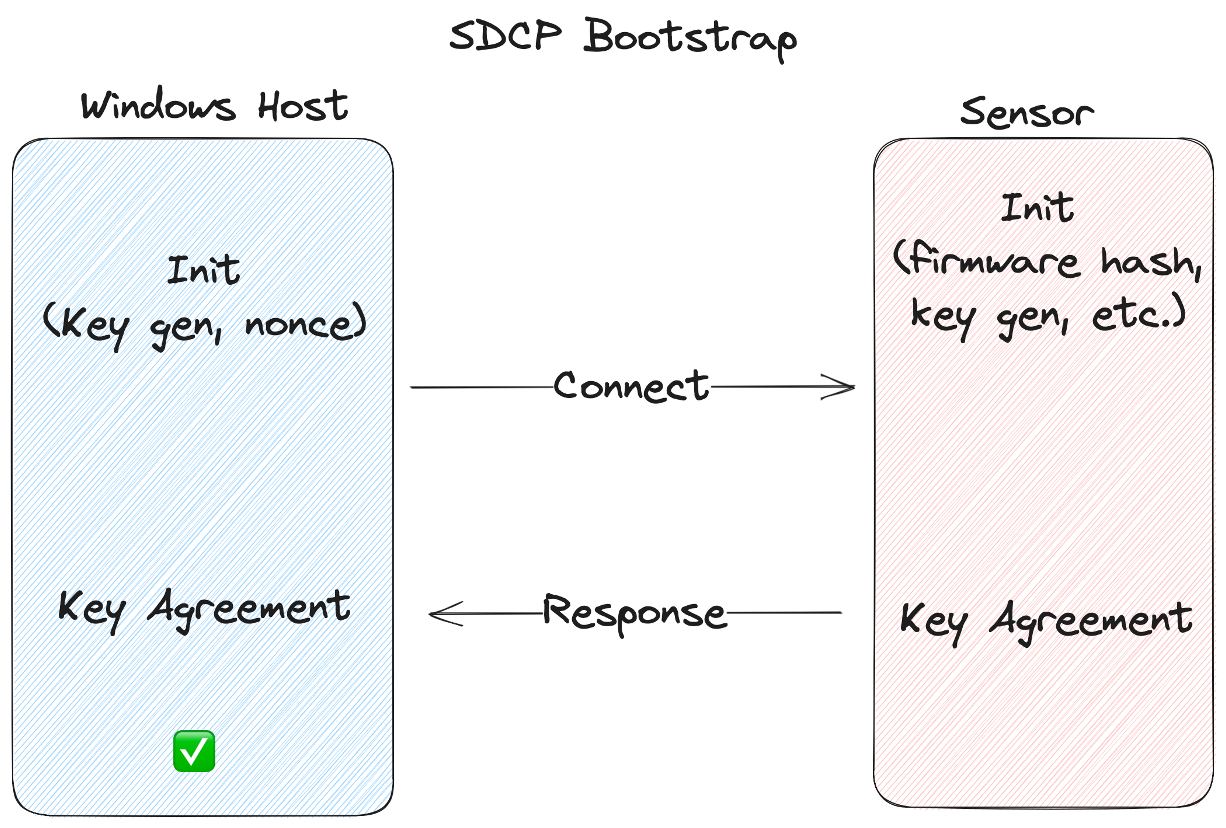
Once the firmware is running, a secure connection must be bootstrapped between the device and the host.
Secure Connection Bootstrap
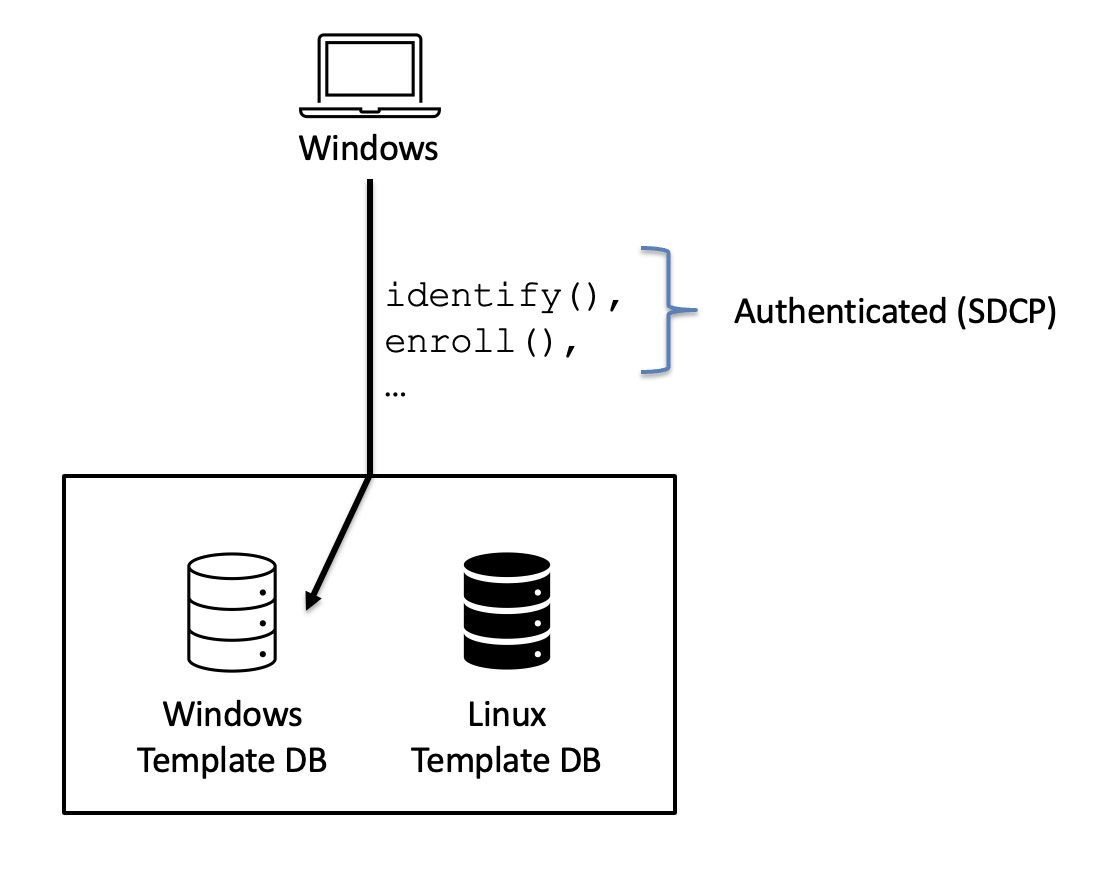
To create a secure connection, the host and device perform key agreement and derive shared session keys for authentication and encryption.
This secure, authenticated, connection is used to transmit the device’s signed attestation so the host knows it’s communicating with a valid device. It’s also used for subsequent secure biometric operations like enrolling new fingerprints and identifying users (authentication).
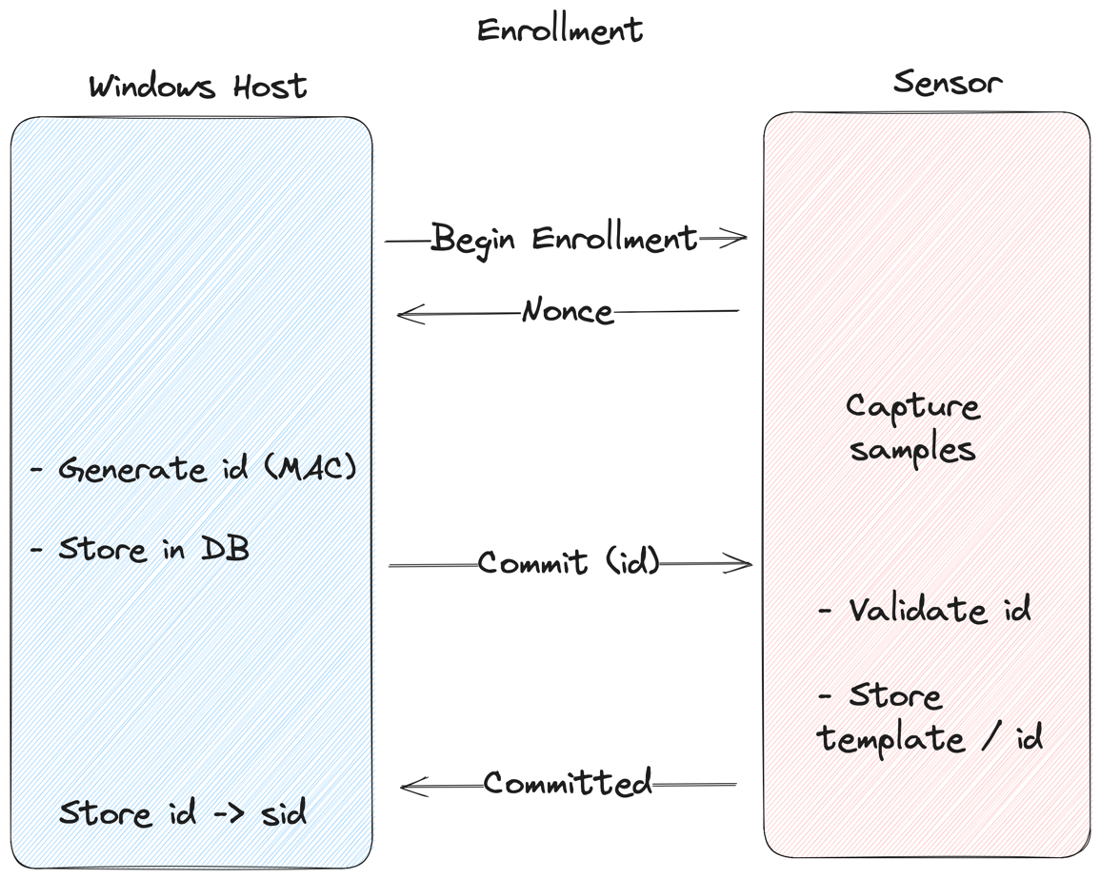
Enrollment
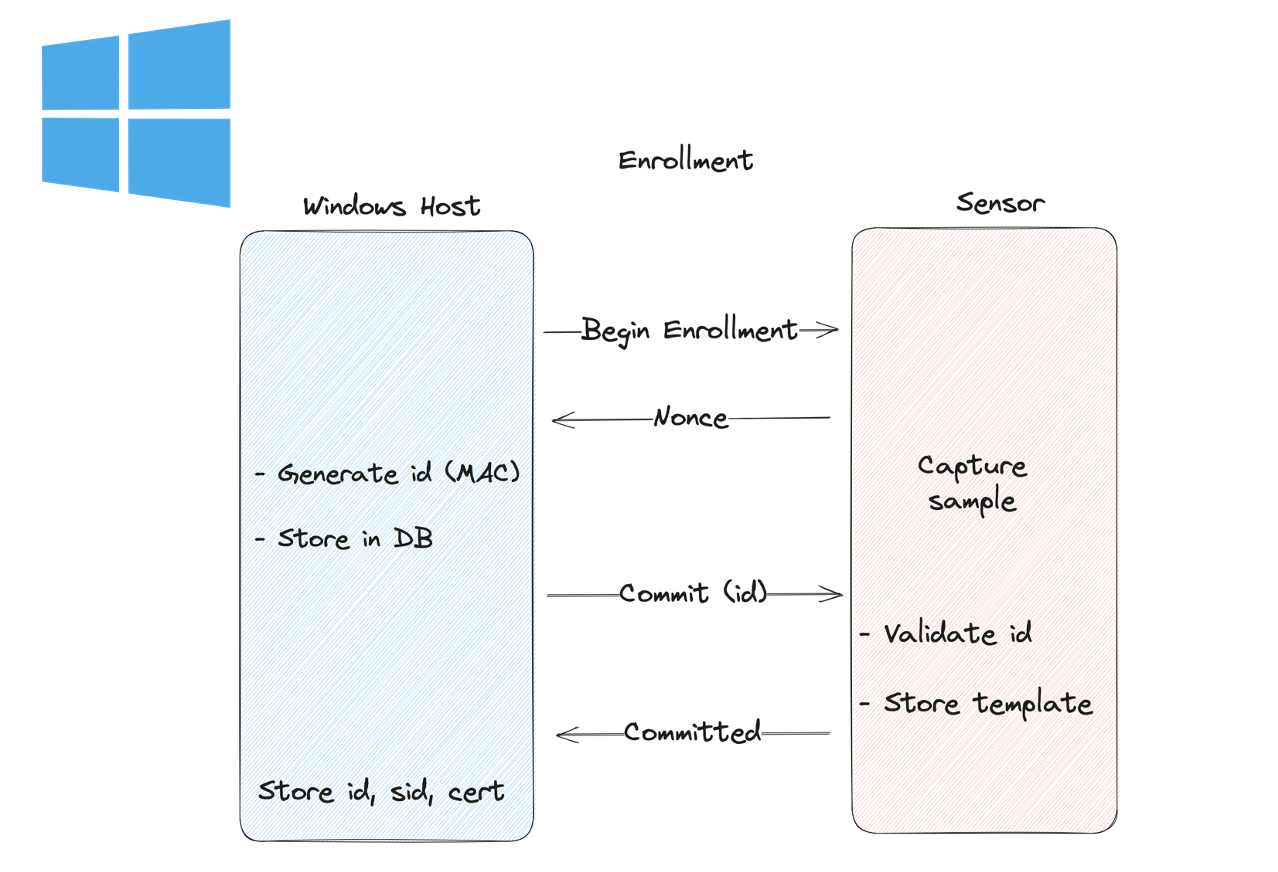
When enrolling a new fingerprint, the sensor generates a nonce and sends it to the host, which then MACs the nonce using the shared secret that was negotiated as part of the bootstrap process. This MAC’d nonce is then sent back to the sensor, which repeats the process to verify authenticity, and stores the resulting value in the template database. The host also stores the MAC’d nonce, mapping it to the current user’s Windows SID. This value is no longer used as a MAC, but is a unique id for that template.
This ensures that a spoofed host or MitM can’t enroll fingerprints with arbitrary IDs. Instead, a unique authenticated value is used as the identifier. Otherwise, you could enroll an attacker’s fingerprint in the sensor’s database with the same id as an authorized user (we’ll come back to this… 😉).
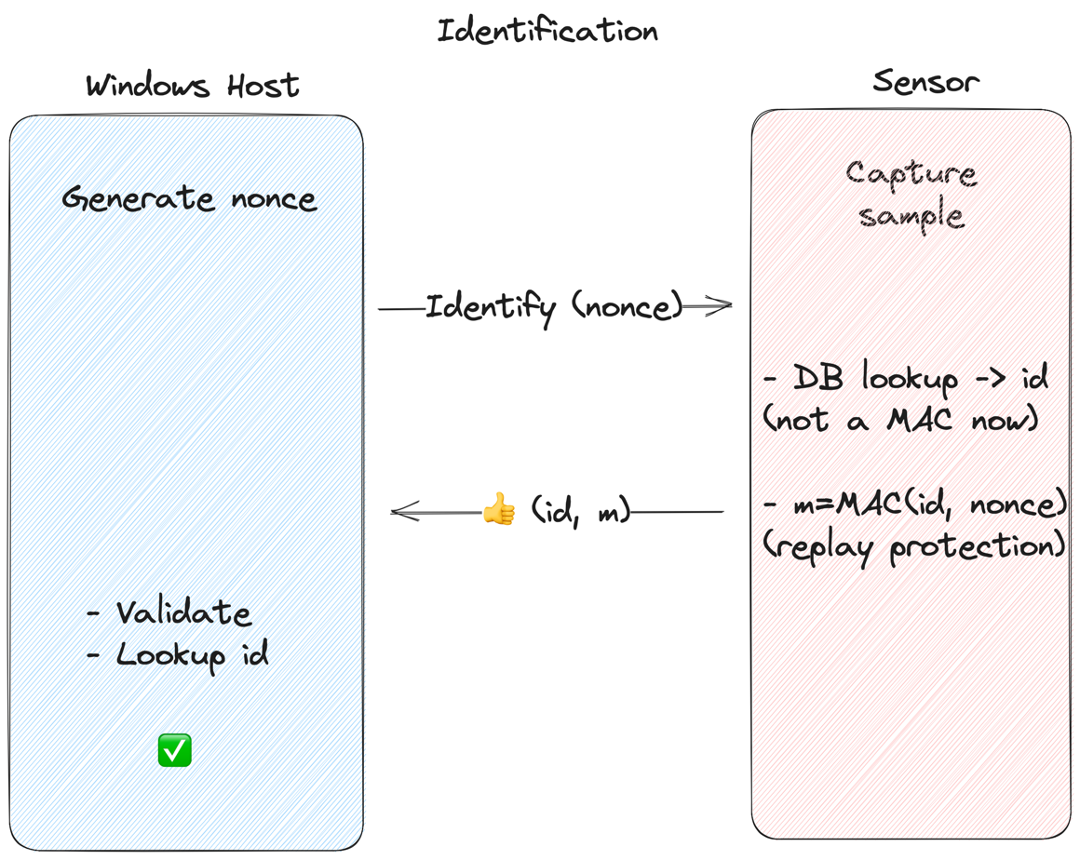
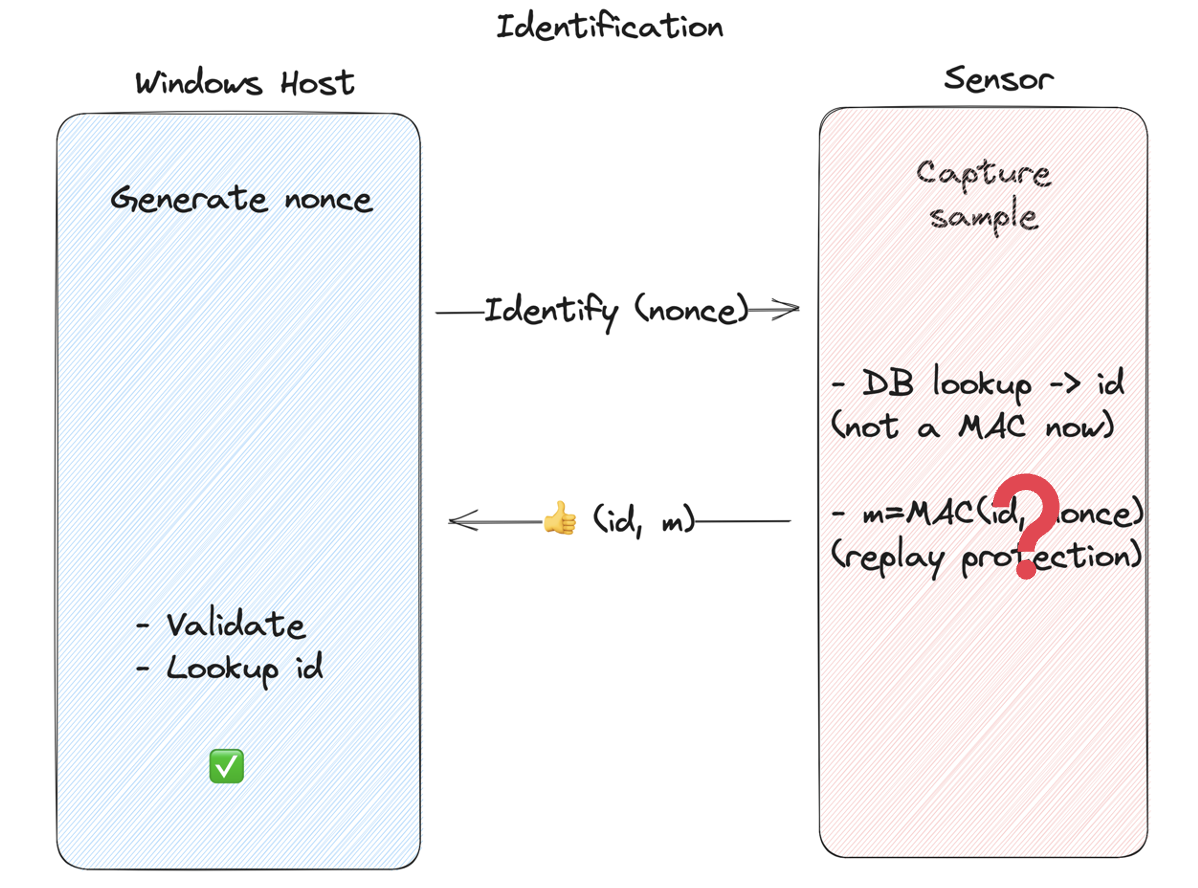
Identification
To authenticate, the host generates a nonce and sends it to the sensor. The sensor then performs the biometric matching operation — if the presented fingerprint matches a known template, the sensor MACs the id and nonce using the shared secret, and sends the id and MAC back to the host. The host then validates the authenticity of the MAC and looks up the id locally to find out what user is authenticating.
This is to prevent an attacker with access to the communication between the host and sensor (MitM) from intercepting and replaying valid identification messages.
There are other details to SDCP, but these are the primary elements that are relevant to our research:
- Validate the sensor is authentic and not running known bad firmware
- Secure the enrollment process so that rogue fingerprints can’t be enrolled into the sensor
- Secure the identification process so an attacker can’t spoof or replay it
Now that we understand the goals of SDCP, we’ll talk about our initial discovery and prioritization process.
Prioritization
Our first step in the vuln research process was prioritizing which target to focus on first. To accomplish this we performed an initial survey of each of the targets to gather information about them and rank them by difficulty. After doing some background research, initial reverse engineering of the host drivers and firmware, inspecting the hardware and configuration, and trying to inspect the communication protocol, we tried to answer the following questions:
- Is the sensor supported by other operating systems?
- Linux driver support could greatly reduce the amount of reversing necessary
- What is the communication bus?
- USB, I2C, something proprietary, …?
- How does the code “smell”?
- Does it seem poorly developed / higher probability of bugs?
- Is the firmware encrypted?
- Is the communication between the host and sensor encrypted?
After answering these questions, we decided to prioritize our targets in the following order:
- Target 1: Dell Inspiron 15
- Good Linux support
- Poor code quality
- Clear text communication
- USB
- Encrypted firmware
- Notes: The Inspiron uses a match-on-chip sensor from Goodix. The sensor communicates with the host via internal USB. The firmware is encrypted, but a high-level analysis of the host driver has signs of poor design and code quality. Linux support with libfprint seems to be pretty complete. Initial USB captures with usbmon revealed cleartext USB communication. A variety of registry keys available to help debug, including enabling detailed debug logging.
- Target 2: Lenovo Thinkpad
- Limited Linux support
- Better code quality
- Encrypted host to sensor communication
- USB
- Encrypted firmware
- Notes: The ThinkPad uses an embedded sensor from Synaptics. Firmware is also encrypted. Initial high level review of reverse engineered driver seemed to be higher quality code than the Goodix. USB communication appeared to be encrypted. Linux support with libfprint appears to be pretty limited.
- Target 3: Microsoft Surface Pro X
- No Linux Support
- Ambiguous code quality
- Encrypted firmware
- Notes: The Surface Pro X (our initial device) runs Windows on ARM, which made getting initial tools running more difficult. The sensor in the removable Type Cover with Fingerprint Reader is an ELAN, which shows up as a USB device, but the connection between the Type cover and the Surface was unknown. These factors, along with the fact that the Surface and Type Cover are Microsoft branded suggested this might be the most difficult target, so we focused on it last.
So after our initial analysis, we decided to first focus on the Dell.
Target One - Dell Inspiron
As mentioned above, the Dell Inspiron uses an embedded match-on-chip sensor made by Goodix.
The sensor has full support for Windows Hello and SDCP, and also has good support for Linux. One of our first objectives was to write a Wireshark dissector to understand the proprietary communication protocol spoken by the driver and sensor. Fortunately, the Linux driver covered a good portion of the protocol, and we were able to fill in missing pieces by reversing the Windows driver. We’ll go into deeper technical detail in a subsequent post.
Windows & Linux

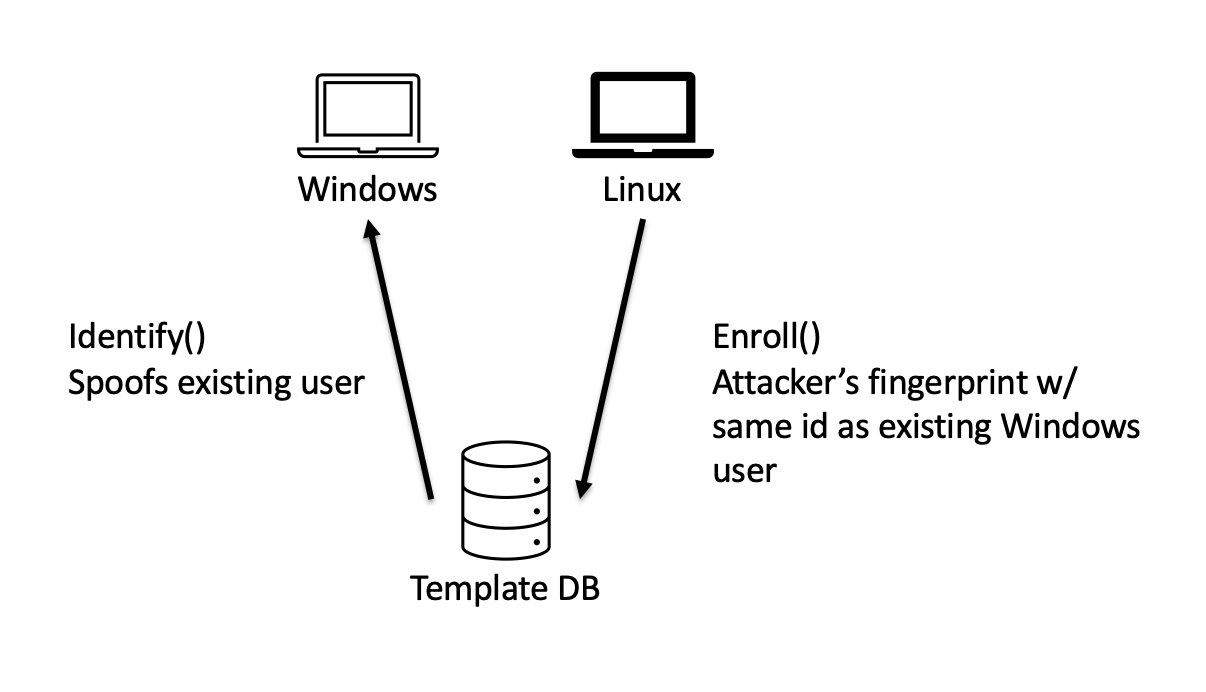
After comparing the enrollment operations on the Windows and Linux sides, we found that while enrolling via Windows follows the enrollment process specified in the SDCP spec, enrolling via Linux does not. Specifically, on Windows the template ID stored in the database is the result of a MAC operation on the host and validated on the sensor, which prevents using arbitrary IDs. On Linux though, SDCP isn’t implemented, so the host driver simply generates an ID and sends it to the sensor for storage.
Goodix Windows Enrollment (SDCP)

Goodix Linux Enrollment
The astute reader might notice a problem. We had an idea… 💡
What if we boot the target device into Linux and use the Linux side to enroll an attacker fingerprint into the template database, specifying the same ID as a legitimate user enrolled on the Windows side?
Infoleak
The first problem is determining a valid ID. How would we know the ID value of a legitimate Windows user? Fortunately, enumerating enrolled fingerprints is a built-in feature of the protocol. This enables the Windows login screen to show the option for fingerprint authentication (see screenshot). The host queries the sensor for known fingerprints and IDs, and shows the login with fingerprint option if the sensor has an ID that matches that of a local user. This operation is unauthenticated. Infoleak by design.
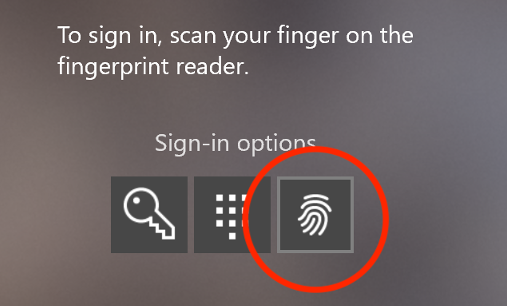
Windows Hello login with fingerprint option
The Plan
So that was the plan:
- Boot to Linux
- Enumerate valid IDs
- Enroll attacker’s fingerprint using the same ID as a legitimate Windows user
- Boot Windows
- Login as the legitimate user with attacker’s print
Unfortunately, the plan didn’t work… 😞
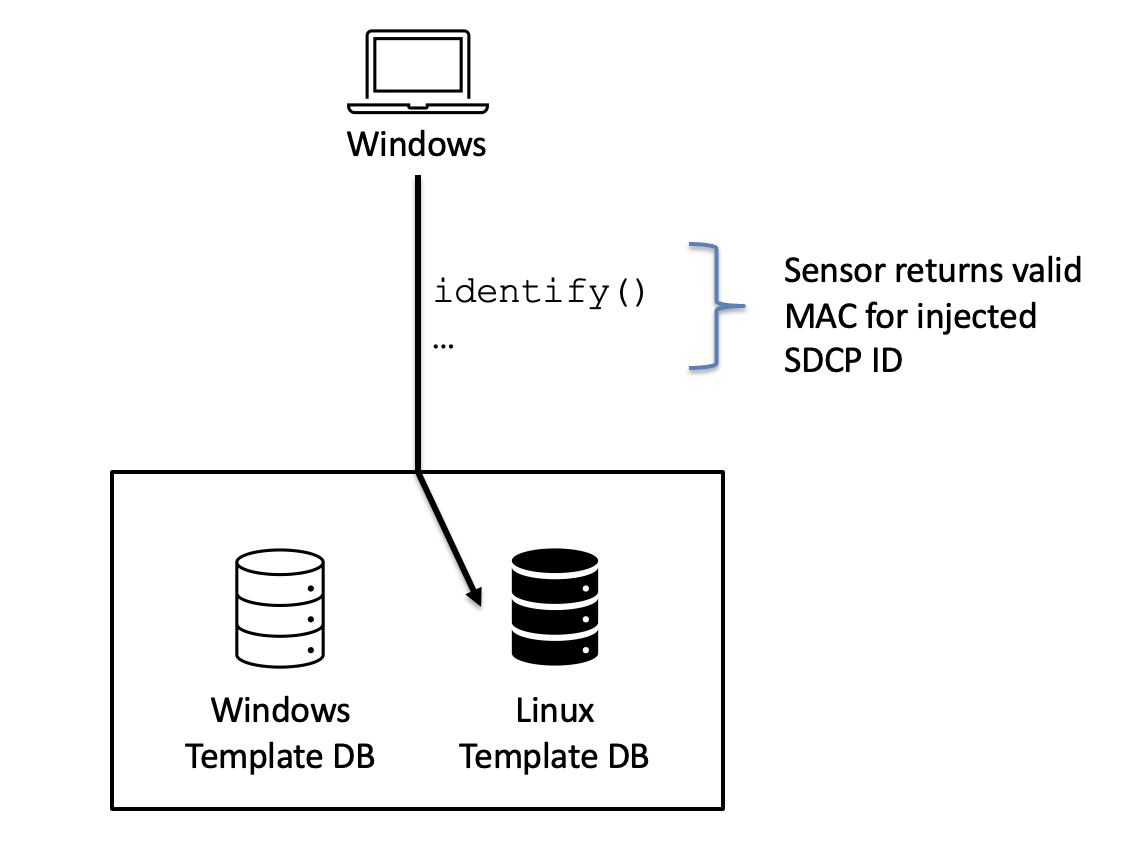
We found that the Linux and Windows enrollments are stored in two separate databases on the chip, so a user enrolled on the Linux side can’t login on the Windows side.

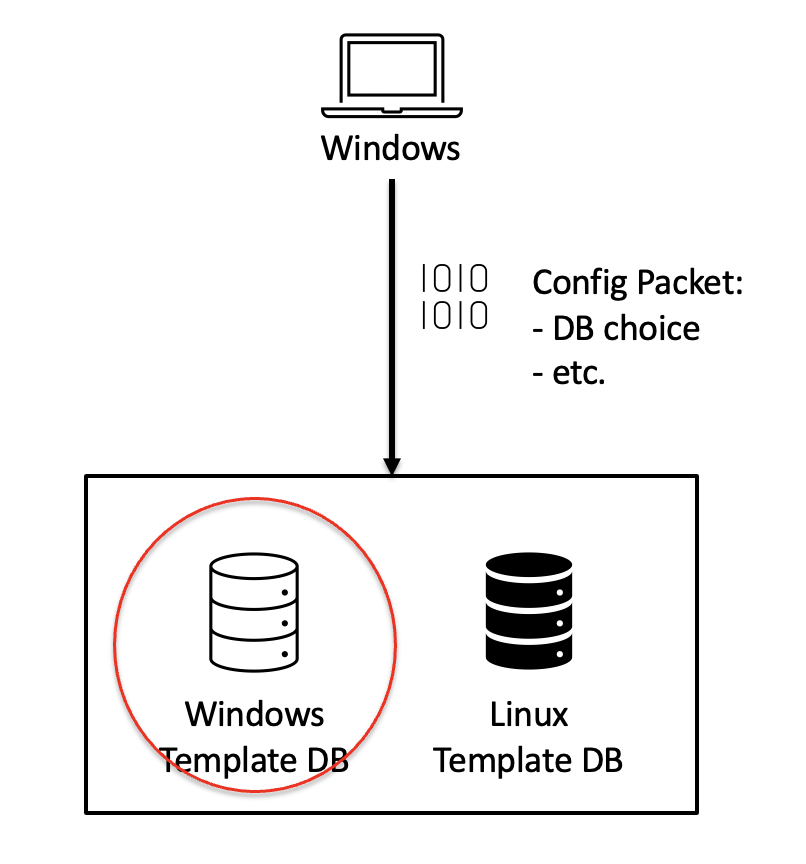
Goodix sensor has separate Windows and non-Windows databases
How does the chip know what database to use?? 🤔
It turns out that the respective drivers send a configuration packet to the sensor when the sensor is initialized. Along with several configuration options, like how sensitive to be about fingerprint matching, etc., it also tells the sensor which database to use. This configuration persists until the sensor receives a new configuration packet. And this packet is unauthenticated!!
The Plan … Part Deux
So here’s the new plan:
- Boot to Linux
- Enumerate valid IDs
- Enroll attacker’s fingerprint using the same ID as a legitimate Windows user
- MitM the connection between the host and sensor
- Boot Windows
- Intercept and rewrite the configuration packet to point to the Linux DB using our MitM
- Login as the legitimate user with attacker’s print
The big question: If the sensor is using the Linux DB, will it still follow the SDCP Identification process, MACing the template ID before sending it back to the Windows host? If not, the attack won’t work, because the validation on the Windows host wouldn’t match.
To test, we hooked the driver with windbg and rewrote the configuration packet before it was sent to the sensor, and … IT WORKED!!🎉
Ok, so now all we need to do is throw together a USB MitM, and we have a solid, 100% reliable Windows Hello bypass. A USB MitM should be easy, right? I mean there’s tools available in the Defcon vendor room to do it. Should’t be too hard. ¯\_(ツ)_/¯
USB MitM
First we needed to rehost the embedded fingerprint sensor from internal embedded USB to external USB so we could more easily MitM the connection. After some hardware RE and some quick soldering, we had a rig we could plug the sensor into to connect it to the external USB ports.
Next, we just needed to MitM the connection. If you Google USB MitM, you’ll find a bunch of “solutions” that seem like they should work. Unfortunately, we found them all to fall pretty short on modern targets. There are several archived repositories like USBProxy and others. The popular choice today seems to be a mix of hardware and software: The GreatFET One by Great Scott Gadgets, combined with FaceDancer (originally developed by Travis Goodspeed and now maintained by GSG). There’s even an example in the FaceDancer repo to demo MitMing the USB connection between a Nintendo Switch console and controller and inverting the X axis on the controller by rewriting the packets. Sounds like exactly what we need!
So we got a GreatFET One, wrote our exploit as a FaceDancer filter, and … it didn’t work. 😞
(We also ordered a USB Luna, now called the Cynthion, but it still hasn’t shipped over a year later thanks to supply chain issues.)
It turns out none of the current tools handle High-speed (USB 2.0) devices. We also found that the currently available tools don’t adhere to the USB specification in various ways. One problem in particular is how they deal with USB zero-length packets (ZLP).
Again, we’ll go into deeper technical detail in a follow-up post, but real quick: ZLPs are sent as a part of USB bulk transfers when the transfer size is an exact multiple of the max packet size (i.e. transfer_size % MAX_LEN == 0). When that’s the case, if the ZLP isn’t received, the recipient just waits until it finally times out.

Zero Length Packets (ZLP)
This is exactly what we saw when we plugged our sensor into the host via the GreatFET, the host didn’t even recognize the device.
To overcome this, we abandoned the widely available USB MitM tools and developed our MitM directly in Linux on a Raspberry Pi 4 — using the Linux USB Raw Gadget driver and the RPi4’s USB OTG port. We’re considering developing a FaceDanceresque framework for prototyping / MitMing USB using this setup.
With all that out of the way, we now had a production ready, 100% reliable exploit for bypassing Windows Hello fingerprint auth on the Dell!
To recap, these are our final exploit steps:
- Disconnect embedded fingerprint sensor and plug into RPi4
- Code on the MitM device enumerates valid fingerprints in the Windows DB and then initiates enrollment
- Attacker enrolls their fingerprint as a valid Windows user into the Linux DB
- The MitM device connects sensor to target host and rewrites configuration packet to point to Linux DB
- Attacker authenticates with their own fingerprint as a legitimate Windows user
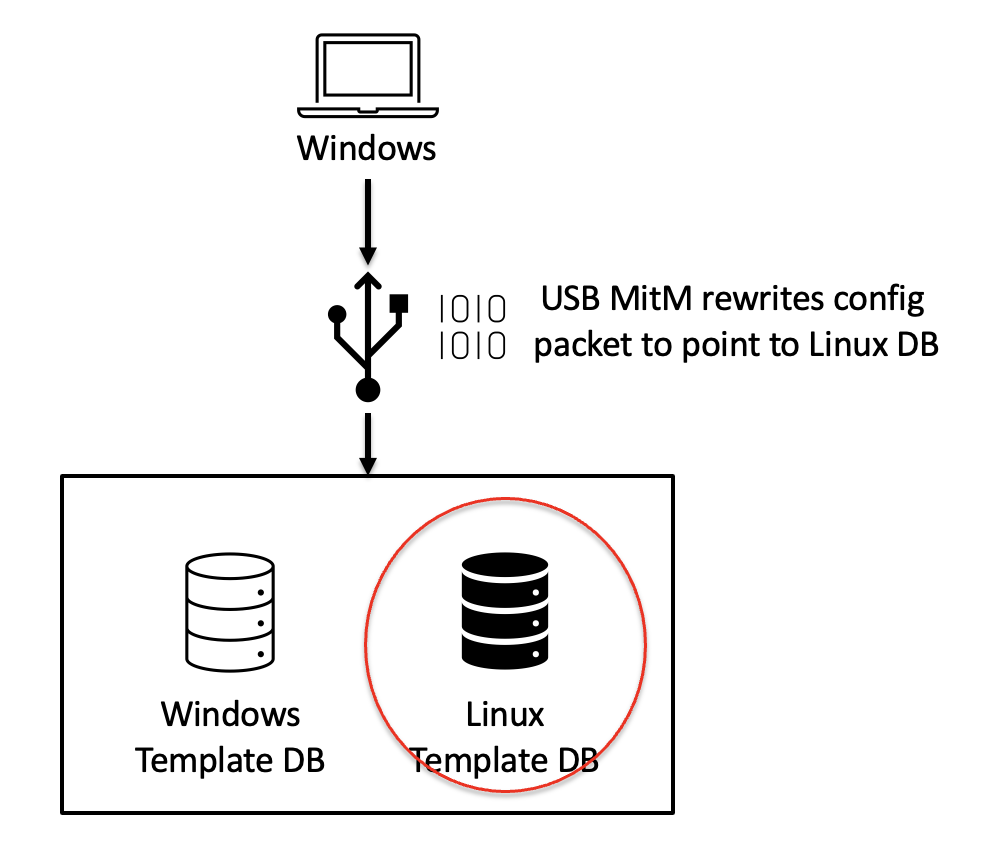
USB MitM rewrites config packet to point to Linux DB
SDCP still works between Windows and the sensor
Target one down, now on to target two.
Target Two - Lenovo ThinkPad
Our second target was the Lenovo ThinkPad T14s, with a Synaptics fingerprint sensor. Like the Goodix sensor, we plan to follow up with a more detailed technical post on our exploitation, but here’s an overview.
Although it initially appeared that this sensor supports SDCP, we couldn’t find any of the tell-tale signs of SDCP in our USB captures. Eventually we found that while the driver and sensor do support SDCP, the OEM apparently decided to ship with it disabled!
Instead of SDCP, the Synaptics sensor relies on a custom TLS stack to secure USB communication between the host driver and sensor. So, in order to go further we needed to break TLS.
After a lot of RE, we understood how the TLS stack worked:
- On initial pairing, the sensor creates and signs client certificates for the host to use for authentication. The client certificate and private key is stored as an encrypted blob in a readable flash region on the sensor.
- On subsequent initializations, the host requests the encrypted blob and decrypts it.
- It then uses the decrypted client certificate / key bundle to authenticate to the sensor, building up a secure TLS tunnel between the host and sensor.
- Subsequent operations via TLS are considered secured.
So, if we can negotiate TLS and talk to the sensor, maybe we can do whatever we want? 🤔🧐
Custom TLS Stack
Again, to aid in reverse engineering this protocol we developed a custom Wireshark Dissector to understand the USB traffic. This required reimplementing their (broken) TLS stack and extracting keys in-process with DBI (frida). Unfortunately, their custom TLS implementation was broken in several ways, but none that materially affected the security model. Only enough that off-the-shelf TLS implementations like OpenSSL wouldn’t work.
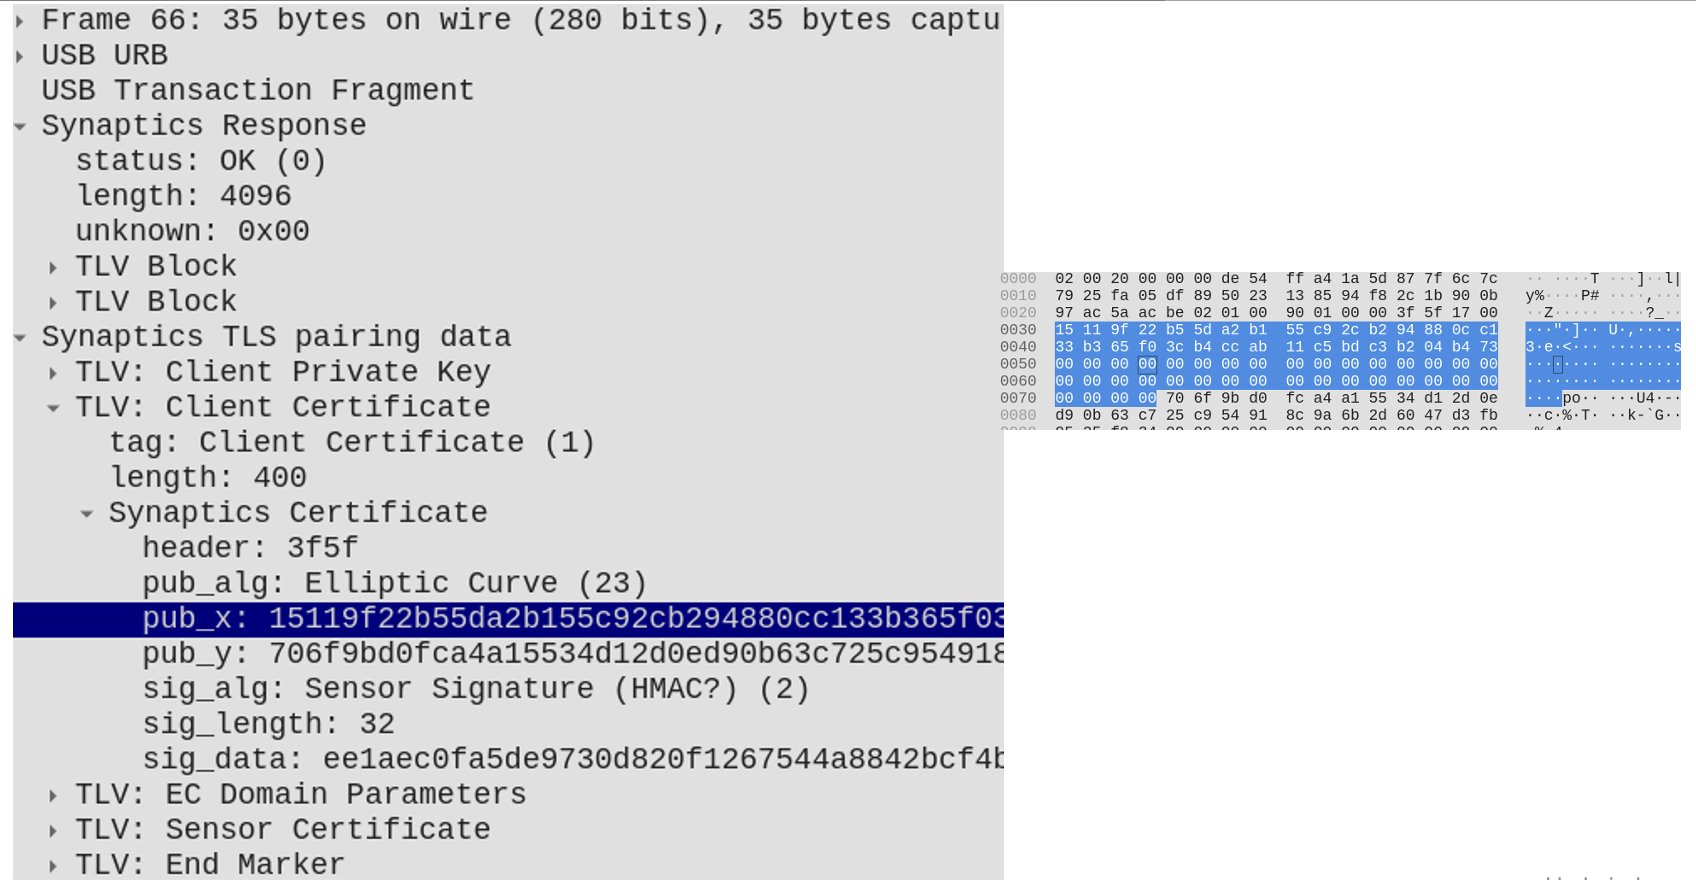
 Wireshark with custom dissector to decrypt Synaptics TLS traffic
Handshake
So how can we negotiate TLS, using client authentication, so the sensor thinks we’re the host?
Remember, the client certificate & key are readable by anyone, but they’re encrypted. Encrypted with what? Lots more RE later, it turns out they’re encrypted by a key derived from two pieces of information: the machine’s product name and serial number — which it retrieves from the BIOS via ACPI (they’re also available on the sticker on the bottom of the laptop 😜).
It’s not clear why they do this, but it seems likely it’s to enable a feature these laptops have that allows single sign-on to Windows once you’ve authenticated to the BIOS. This feature allows the BIOS to decrypt the client certificate on the sensor so that it can use it to automatically log into Windows without requiring the user to authenticate again. We didn’t get a chance to dig deeper into this feature, but it seems … fun. We definitely want to look at it closer. 😉
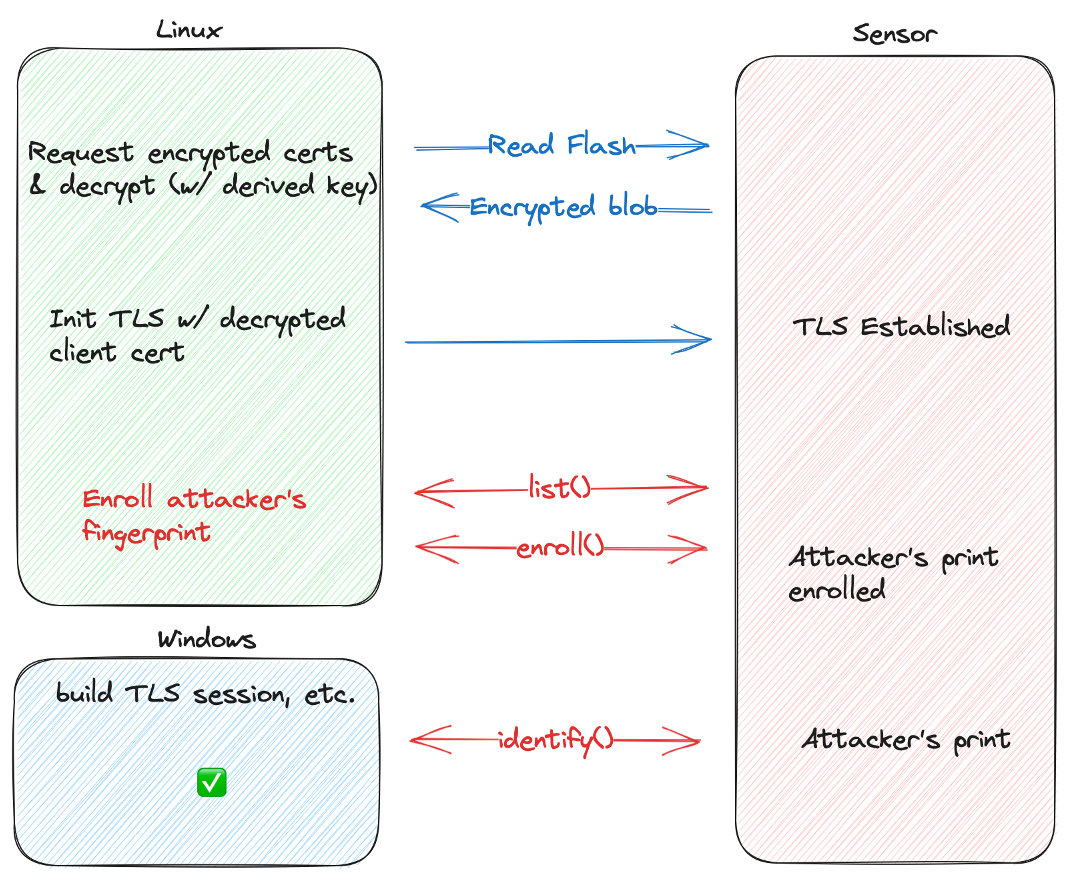
Exploitation
Once we were able to decrypt the encrypted blob and negotiate a TLS session with the sensor, exploitation was just an engineering problem. A matter of implementing enough of the custom protocol to perform a similar attack to the Goodix:
- Read encrypted client cert / key
- Decrypt encrypted blob with key derived from product name & serial number
- Negotiate TLS session with sensor
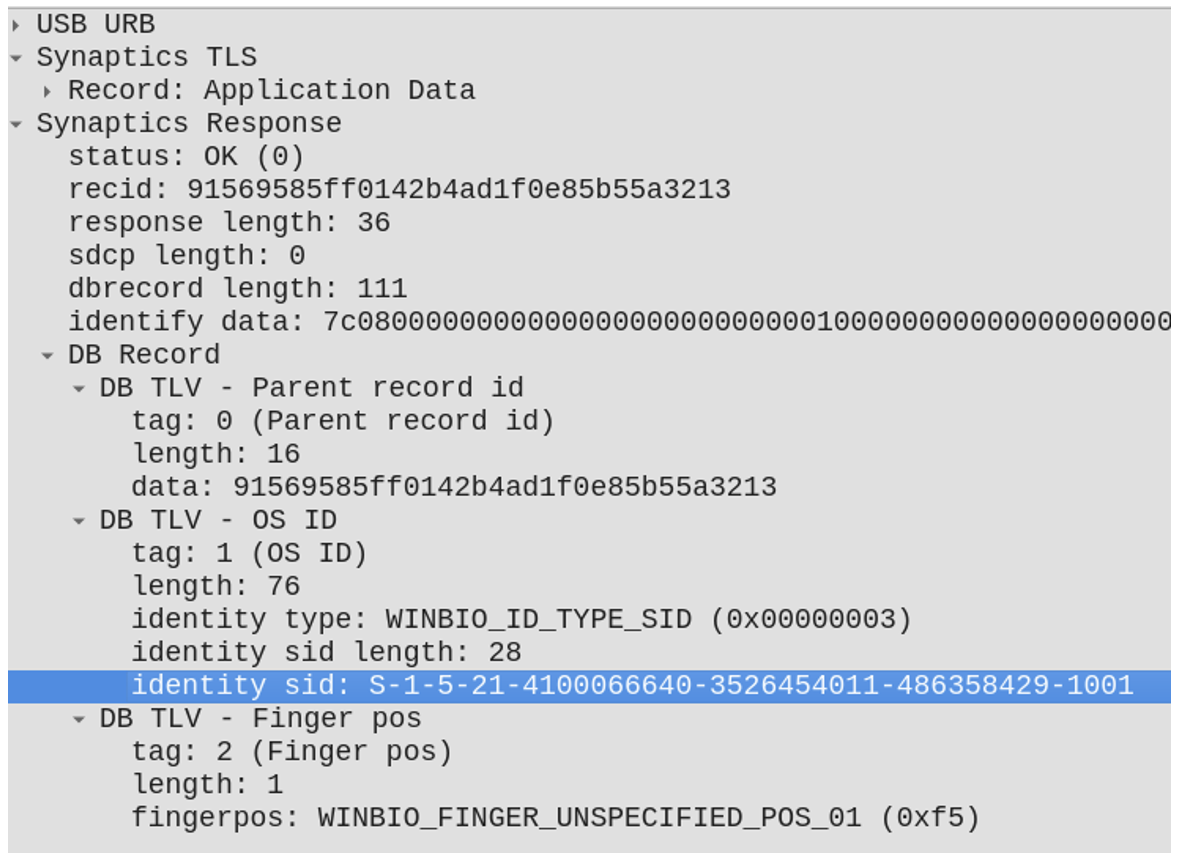
- Enumerate valid Windows fingerprint template IDs
- Enroll attacker’s fingerprint, spoofing valid ID
- Boot into Windows
- Login as target Windows user with attacker’s fingerprint
Boom! Two targets down, one to go.
Target Three - Microsoft Surface Pro X/8 Type Cover
The Microsoft Surface Type Cover uses an embedded fingerprint sensor made by ELAN. We’d been avoiding this device because it seemed like it could be the hardest target, and at this point we were basically out of time. We decided to take a quick look and were surprised what we found.
- No SDCP
- Cleartext USB communication
- No authentication
In fact, any USB device can claim to be the ELAN sensor (by spoofing its VID/PID) and simply claim that an authorized user is logging in!
Here’s what the protocol looks like at a high level:
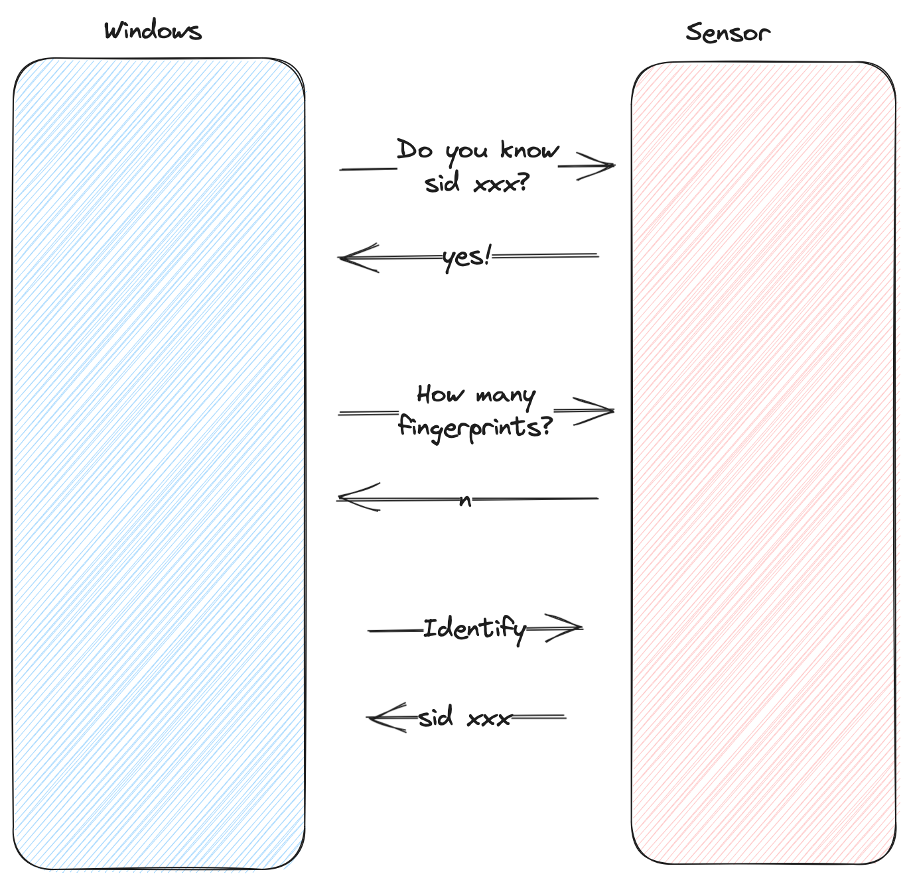
The only “check” the host does is validate that the number of fingerprints the sensor knows about matches the number the host has. We’re not sure why it does this, but it might be an easy way to detect if someone simply plugged in the wrong Type Cover. While this isn’t really a security control, we can easily bypass this “check” by querying the sensor ourselves first, like so:
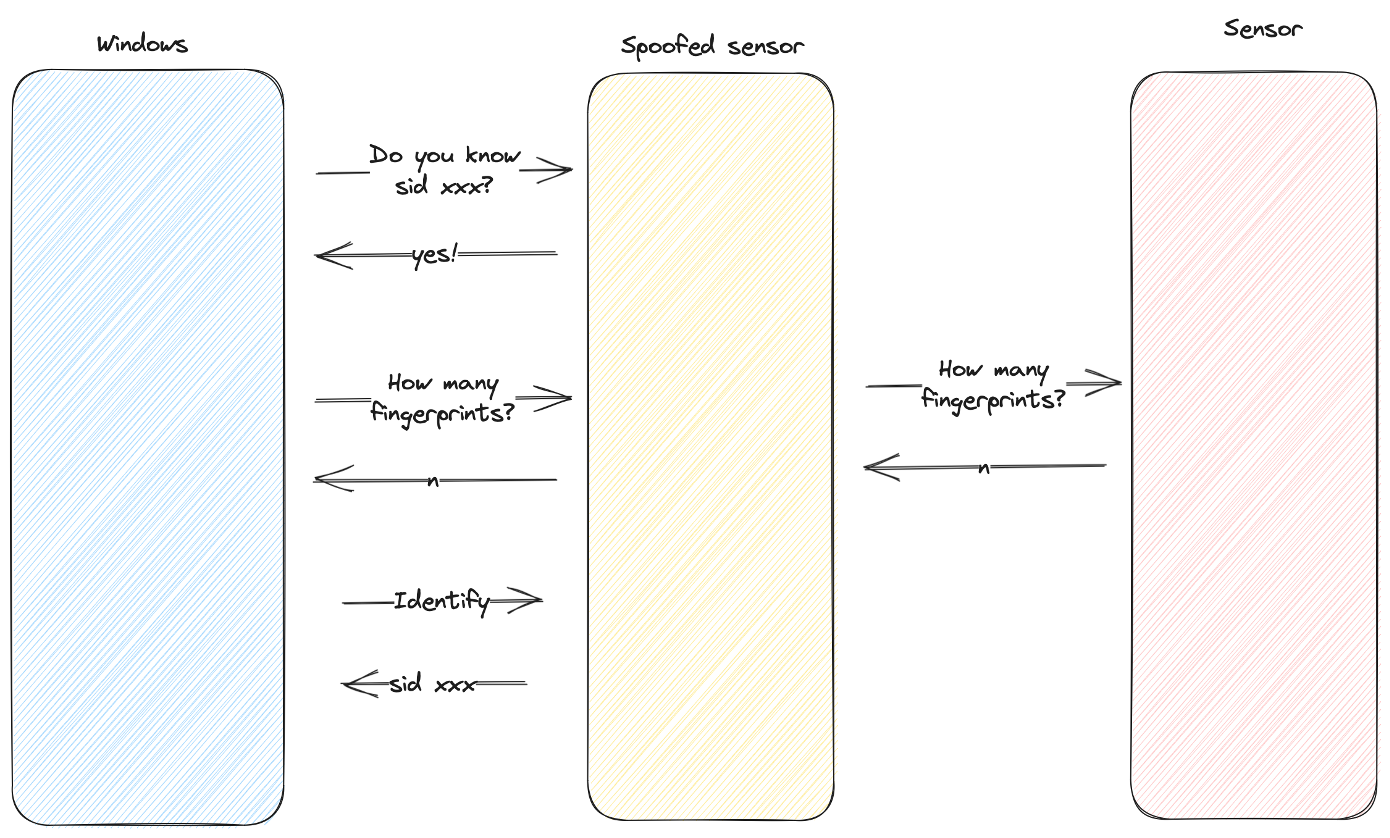
Our attack then consists of the following steps:
- Unplug Type Cover (the driver can’t handle two sensors plugged in, it goes wacky)
- Plug in attack device, advertise VID/PID of sensor
- Observe valid SID from Windows driver
- Pass “how many fingerprints” check
- Initiate Fingerprint Login on Windows
- Send Valid Login Response From Spoofed Device
We initially implemented this attack on a Raspberry Pi 4, but reimplemented it in TamaGo on the USB armory since the RPi4 takes too long to boot and we wanted a quicker demo. 😜
Conclusion
In all, this research took approximately three months and resulted in three 100% reliable bypasses of Windows Hello authentication!
Biometric authentication can be super useful to allow users to conveniently log in. This is especially useful in mobile scenarios, allowing the user to choose a long password to protect against decrypting their data, while letting them access their device throughout the day without the inconvenience of entering the long password. It’s also a key to a future of passwordless device authentication.
Microsoft did a good job designing SDCP to provide a secure channel between the host and biometric devices, but unfortunately device manufacturers seem to misunderstand some of the objectives. Additionally, SDCP only covers a very narrow scope of a typical device’s operation, while most devices have a sizable attack surface exposed that is not covered by SDCP at all.
Finally, we found that SDCP wasn’t even enabled on two out of three of the devices we targeted.
Recommendations
We highly recommend vendors that are manufacturing biometric authentication solutions:
- Make sure SDCP is enabled! (It doesn’t help if it’s not turned on)
- Have a qualified expert 3rd party audit your implementation!
- We’d be happy to work with vendors directly to help secure your implementation — get in touch.
Future Research
There are a number of areas we’d like to continue this research. Here are a few we’re exploring:
Additional Hardware and Firmware Research
- Firmware security
- Although the firmware for the sensors we targeted were all encrypted, the code quality seemed generally poor. From our testing, there’s a high likelihood that the sensors are vulnerable to memory corruption.
- Hidden functionality - there’s quite a lot of functionality that isn’t directly used in normal operation, including debugging and other commands. It’s likely there are other logical vulnerabilities hidden under the surface.
- Direct hardware attacks (JTAG, decapping, storage access, glitching, power analysis, etc.)
- There is no protection if an attacker can directly write to the database or extract secrets from the device
- Side channel attacks to reveal secrets (device-specific keys, firmware decryption keys, etc.)
- Firmware security
Other targets we’re exploring
- Linux
- Android
- Apple
Thanks again to the teams at Microsoft — MORSE and the Windows Hello team for sponsoring this research and allowing us to present it publicly! Most of the things we do we can’t talk about, so it was very nice to be able to talk about this fun research.
Thanks also to the rest of the Blackwing team — as always, this was a team effort!